TP-Link G Router Setup for Business Network
In today's digital age, a reliable and secure network is crucial for any business. With the increasing demand for high-speed internet, it's essential to choose the right router that can support your business needs. TP-Link G Router is a popular choice for businesses of all sizes, offering a range of features and benefits that can enhance your network performance and security.
Why Choose TP-Link G Router for Your Business Network?
TP-Link G Router is designed to provide fast and reliable wireless connectivity for your business. With speeds of up to 867 Mbps, you can enjoy seamless internet access for your employees, clients, and guests. The router also supports multiple devices, making it an ideal choice for businesses with multiple users.
Key Features of TP-Link G Router
- Fast wireless speeds of up to 867 Mbps
- Supports multiple devices with dual-band connectivity
- Advanced QoS (Quality of Service) features for prioritizing traffic
- Robust security features, including WPA2 and SPI firewalls
- Easy setup and management with the TP-Link Tether app
TP-Link G Router Setup for Business Network
Setting up your TP-Link G Router for your business network is a straightforward process. Here's a step-by-step guide to help you get started:
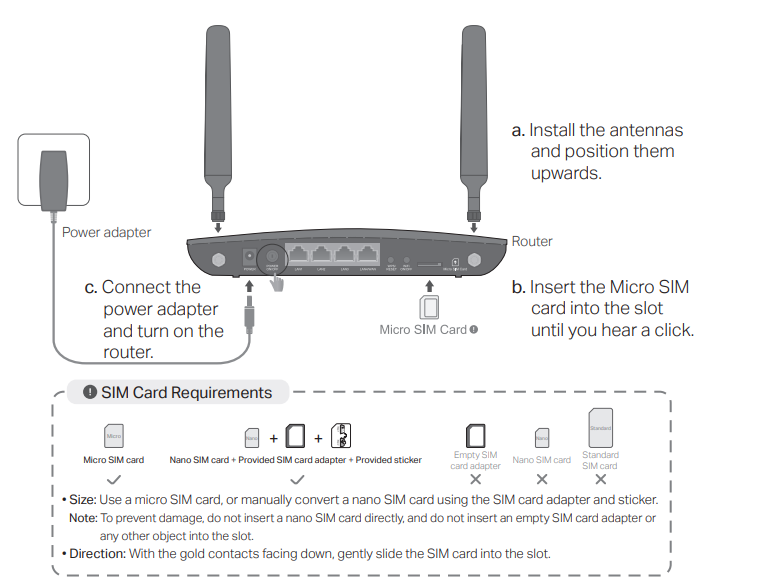
Step 1: Physically Install the Router
Place the router in a central location, such as a server room or a main office area. Connect the router to a power source and turn it on.
Step 2: Connect to the Router's Web Interface
Open a web browser and type the router's default IP address, which is typically http://192.168.0.1 or http://192.168.1.1. Log in with the default username and password, which are usually "admin" and "admin."
Step 3: Change the Default Admin Password
To enhance security, change the default admin password to a strong and unique one.
Step 4: Configure the Wireless Settings
Set up your wireless network settings, including the SSID (network name), channel, and encryption method. You can also configure the wireless schedule to optimize your network performance.
Configuring the Wireless Schedule
The wireless schedule feature allows you to configure your wireless network to turn off during certain periods, reducing unnecessary energy consumption and preventing unauthorized access. Here's how to configure the wireless schedule:
1. Log in to the router's web interface.
2. Go to the "Wireless" tab.
3. Click on the "Wireless Schedule" option.
4. Select the days and times when you want the wireless network to be turned off.
5. Save your changes.
Conclusion
Setting up your TP-Link G Router for your business network is a straightforward process. By following these steps, you can ensure fast and reliable wireless connectivity for your employees, clients, and guests. Remember to change the default admin password and configure the wireless settings to optimize your network performance and security.


")


