Router Access Point Setup For Device Isolation: A Comprehensive Guide
Understanding Router Access Point Setup
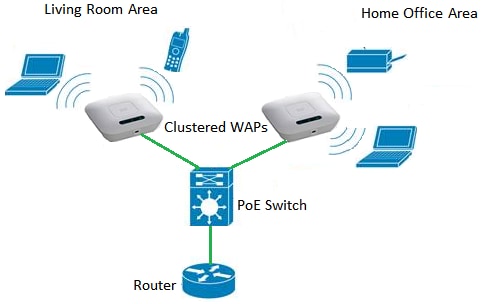
In today's world, having a secure and efficient network is crucial for both home and business users. One of the essential features of a wireless router is its ability to function as an Access Point (AP). An Access Point is a device that provides wireless connectivity to devices on a wired network. However, when it comes to device isolation, not all Access Points are created equal. In this article, we will explore the world of Router Access Point setup for device isolation and provide you with a comprehensive guide to help you understand and implement this feature.What is Device Isolation?
Device isolation is a feature that prevents devices on the same network from communicating with each other. This feature is particularly useful in guest networks, IoT security, and even in homes with multiple users. By implementing device isolation, you can ensure that each device on your network has its own dedicated channel, preventing them from interfering with each other.How to Enable Device Isolation on Your Router
Enabling device isolation on your router is a straightforward process. Here's a step-by-step guide to help you get started:Step 1: Access Your Router's Web Interface
To access your router's web interface, open a web browser and type the IP address of your router. The default IP address for most routers is 192.168.0.1 or 192.168.1.1. You can find the correct IP address in your router's documentation or by searching online.Step 2: Log in to Your Router
Once you've accessed the web interface, log in to your router using the administrator username and password. If you've changed the default password, use the new one instead.Step 3: Navigate to the Device Isolation Page
![[Wireless Router] How to Set up AP Isolated feature? - ASUS](https://www.thewindowsclub.com/wp-content/uploads/2022/04/enable-disable-access-point-isolation-500x286.jpg "[Wireless Router] How to Set up AP Isolated feature? - ASUS")


 : r ...")


 - Ubiquiti Help Center")
